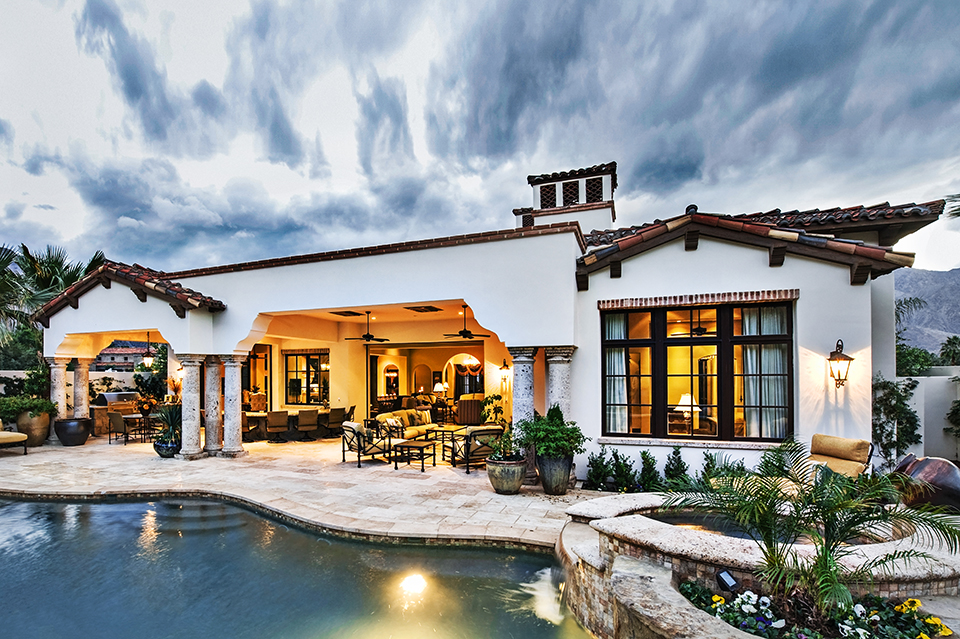
Top 12 Real Estate Photography Tips for Agents
Editing real estate photos can seem a little tricky. But with these few simple and useful real estate photography editing tips, you’ll produce beautiful, consistent photos that stand out among other listings.
Believe us, there are only 12 simple steps to take in order to convey the beauty of interiors of property and increase your sales.
1. Correct Distortions
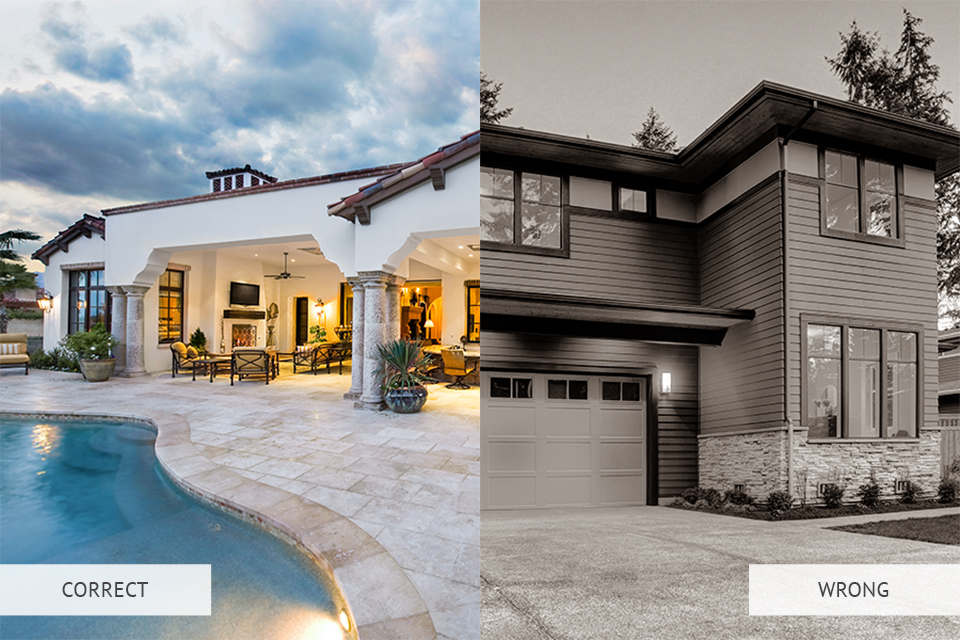
Your camera works in such a way that the light passes through the round lens and then is stretched to a rectangle. With such a mechanism, some distortion is inevitable so the edges of your photo are going to be contorted.
Some angles can show that more than others, making the image really crooked.Without real estate photography editing, any building, inside or outside, is going to look all curved. The lines that we expect to see as straight will bend, creating an unpleasant effect.
To make the property look more natural, make sure to correct distortion and misalignment in the images. View more real estate photo tips http://fixthephoto.com/business/real-estate-photography-tips.html to avoid deep photo editing after photoshoot.
2. Level the Horizon
Apart from vertical, you also need to make sure your horizontal lines are straight.
If you tilted the horizon line, the whole picture will seem slanted and out of balance.While you’re performing real estate photo editing, take care to straighten the horizon line. If you fail to do that, viewers will feel confused by the image. Due to the complicated processes in our brains, we tend to always see the horizon as a straight line even when it’s visibly tilted.
When the distortion isn’t directly understood by a person, he/she just subconsciously dislikes the picture without thinking about the reason.
To make things easier at work, see the recommended tripods for real estate photography http://fixthephoto.com/best-tripod-for-real-estate-photography.html.
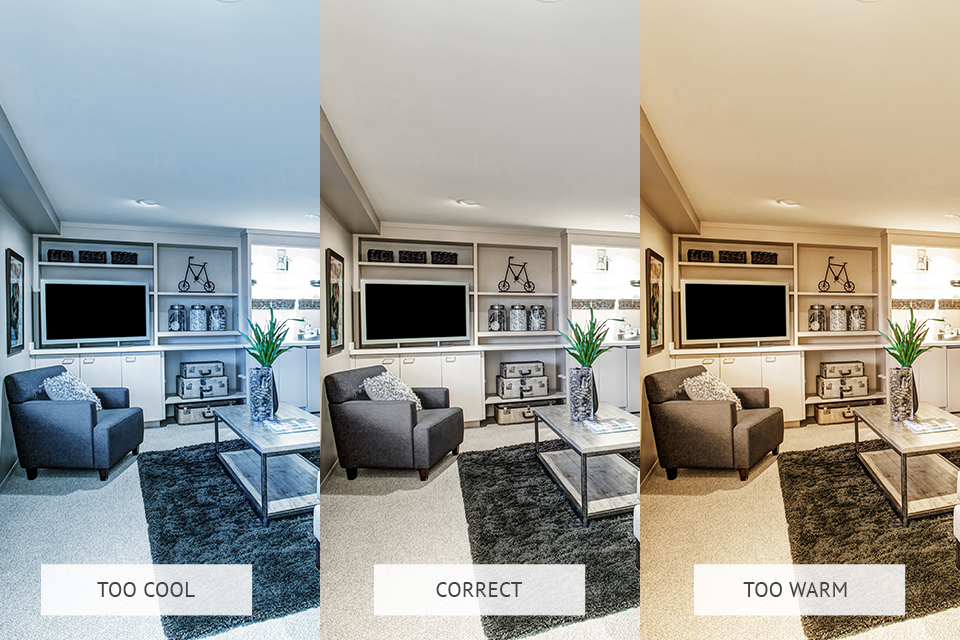
3. Adjust the White Balance
If you’re taking a picture of something white, it may look a bit different in the image and the white balance setting is used to control that.
The way the colors are perceived is subjective and the camera itself has a certain particular way of transforming it. The main rule of real estate photography editing is to make the colors look as natural and close to reality as you can.
When you’re working on an image, you can use the Eyedropper tool, manipulate temperature or tint sliders, possibly use the automated feature.
4. Even Out the Light
What gives images a touch of professionalism is a balance between shadows and highlights when there are no spots on the image that are too dark or light.
To achieve that before you start editing, you will need special real estate photography gear http://fixthephoto.com/business/real-estate-photography-equipment.html. If you don’t have it and don’t plan a purchase, you can correct things using the software.
If you photoshop real estate photos, then you need the Dodge and Burn Tools, if instead, you work in Lightroom, use the Adjustment Brush to go over the problematic areas.

5. Perform Color Correction
One of the most important steps in any kind of image improvement is color correction. Each photo needs a different approach but adjusting such values as saturation, hue, and tint is the basic way of doing it.
If you want an extra pop, try going for Vibrance instead of Saturation. The former works with a secondary group of colors and pulling them up gives the image a subtler and natural look.
6. Adjust the Clarity
Another important step of real estate photography editing is the Clarity setting. If you make the image clearer, you can achieve a great crisp look without abusing contrasts. In some cases, it may be a good idea to pull the darks lower as well, creating a bigger difference between the two.
7. Don’t Apply Special Effects and Filters
While other genres might require you to have an artistic eye and play with a variety of effects, property photos need to stay “bare” for technical reasons. You can’t apply even the classical matte, sepia, b&w or film effects, let alone any other, so restrict yourself to the basic color correction.
Your images need to remain realistic to allow the potential buyers to see the property in its best light and a monochrome image will just make them confused and unwilling to consider the purchase.
8. Clean Up and Remove Unnecessary Objects
In the cases when you sell things, photos should only contain that item and no distractions.
To get rid of unnecessary items or imperfections in images, you can edit real estate photos in either Photoshop or Lightroom using the Stamp Clone or the Spot Removal tool.
With the Spot Brush tool, it is very convenient to remove small imperfections like dust specks or similar stains.
The Cloning tool can deal with bigger items like glares or unnecessary items.
Everything that doesn’t belong to the property should be removed from the photo. That could be gardening equipment, wires, bins, or cars.
If the item is fixed on the property, like a telephone pole, railroad track, fence, or fire hydrant, you are forbidden to conceal them. This is so serious that a lawsuit on misrepresentation can be filed if you break the rule.
9. Try HDR
Even before you do real estate photography editing, you can do your best to get incredible photographs of the property in HDR. For that, you need to shoot the same object with different shutter speeds to get all the details.
You can combine those images together in software and have perfectly clear details both in shadows and highlights.
What HDR does is really closer to what our eyes would see in the same circumstances, which, in turn, is rather different from a common photo.
Cameras don’t work the same way our eyes do so we need to compensate for that and the combination of images is the closest way so far.
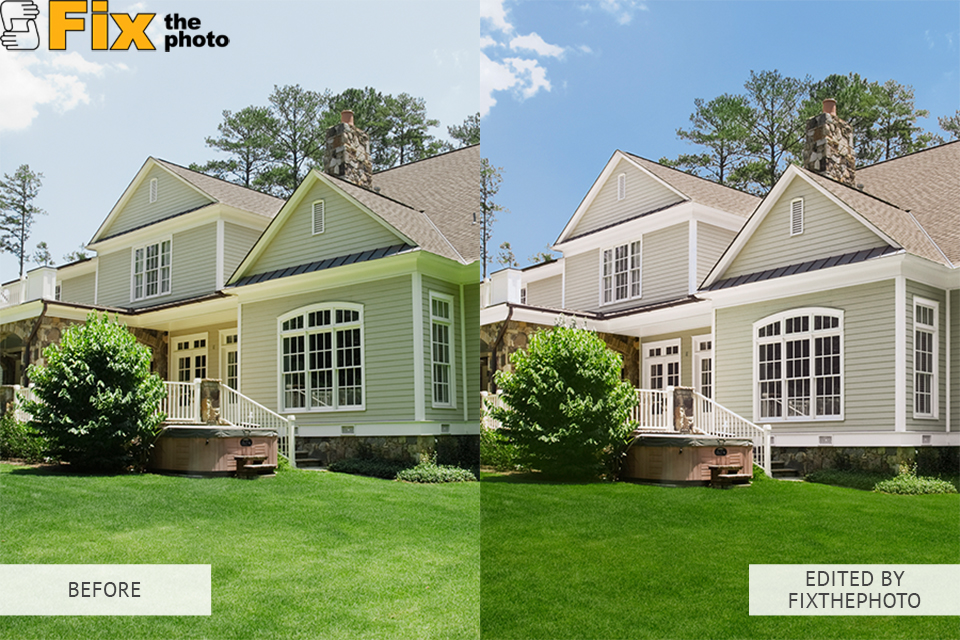
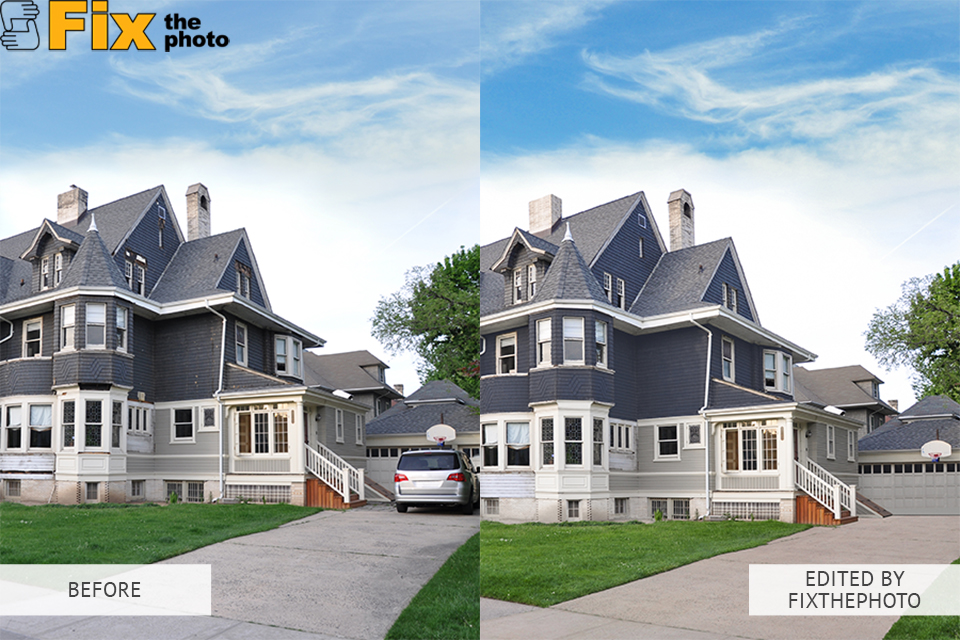
10. Replace the Sky
When the sun is out, all the colors look more vivid. An overcast sky on the day of shooting can really spoil things for the property agent. With a dark sky, even the best houses will lose their attraction.
A good photographer knows how to edit real estate photos to make them look as if they were taken on a sunny day. Replace the sky with a better, sunnier version, and then work on the light levels and colors to make the house itself look brighter. If needed, you can even insert a sunset or a sunrise instead of the boring grey sky.
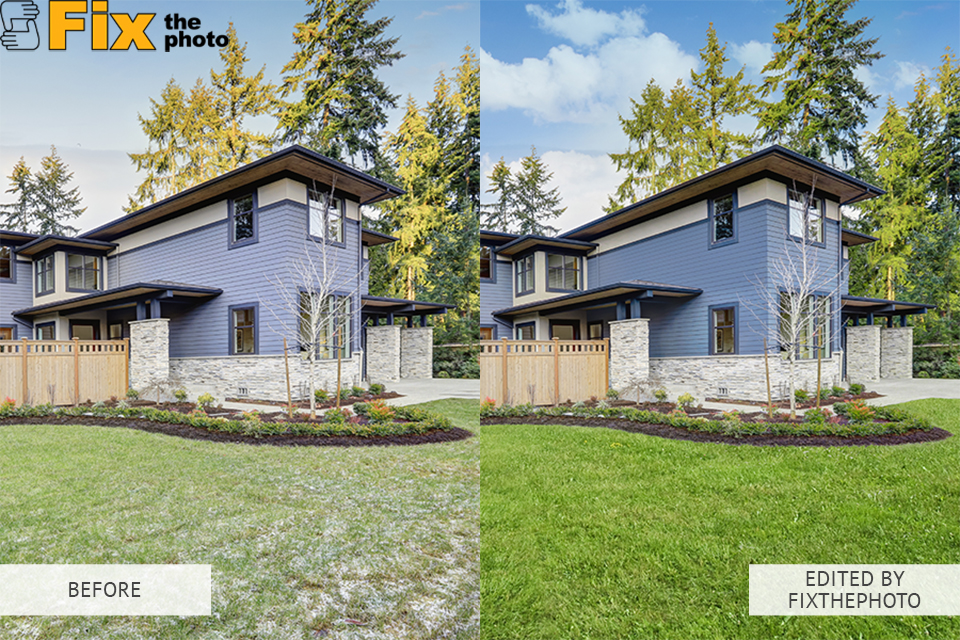
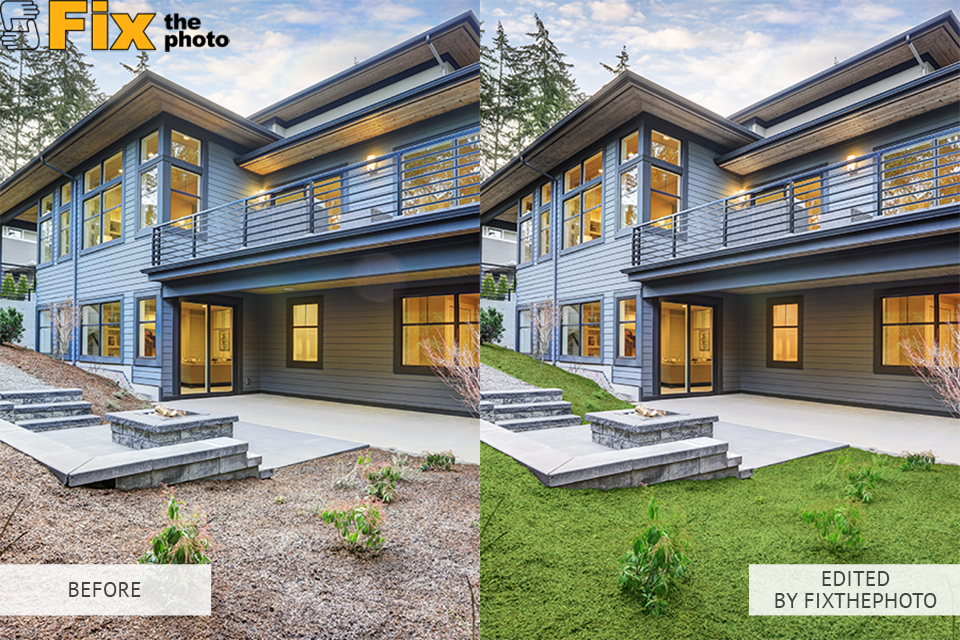
11. Retouch the Lawn and Trees
In images of houses, the adjoining territory often gets neglected. If you devote some time to it in your editing, it can make an incredible difference. If the ground doesn’t have a lawn, you should add it, and if the existing lawn is in a bad condition, then covering the patches and greening the grass is a great idea.
Adding some trees is another nice thing for sprucing up the territory. This way the fresh and vibrant images will attract even more attention from the customers.
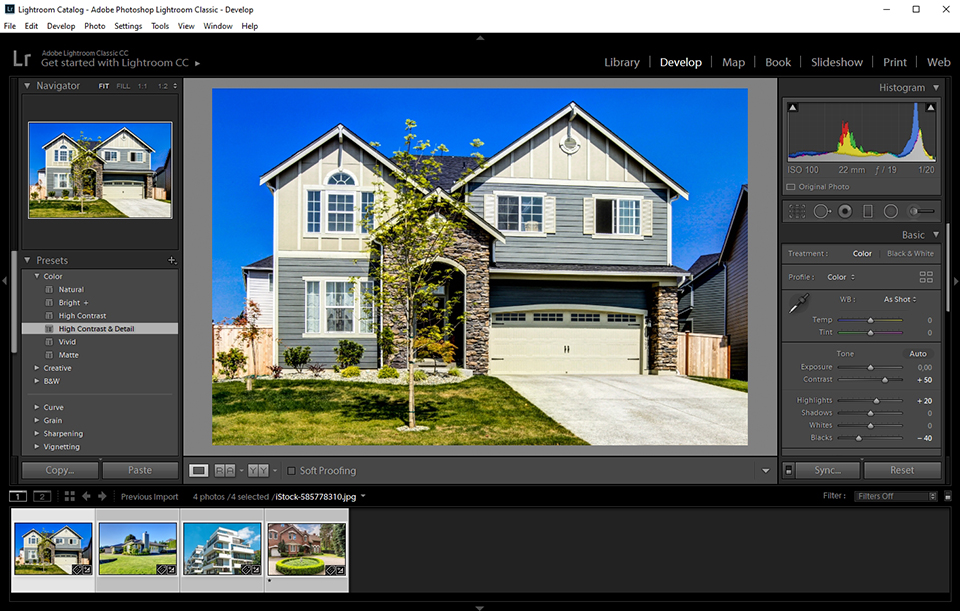
12. Batch Edit
If you spent the whole day shooting properties in a neighborhood, the optimal decision is to batch edit in Lightroom. When several photos are taken with the same exposure, they can be edited as a bundle to save you time.
The same settings get applied to all the images in one click so your photo editing process gets more efficient. You can also start by working on one image and then add the changes to a few more by synchronizing the changes.